最简 Spring AOP 源码分析
Categories: 编程
前言
Spring 最核心的功能就是 IOC 容器 和 AOP。本文定位是以最简的方式,分析 Spring AOP 源码。
基本概念
Spring AOP 代理实现分为 2 种情况:
- 要代理的类是接口:基于
JDK 动态代理实现; - 要代理的类不是接口:基于
CGLIB 动态代理实现。
Spring AOP ` 只能作用于 Spring bean`,使用了 aspectj 的注解,但是完全是基于 Spring 代码实现。
实现原理
Spring AOP 的实现原理是 ` 动态代理 `,具体是什么样的呢?
在 Spring 容器中,我们使用的每个 bean 都是 BeanDefinition 的实例,容器会在合适的时机根据 BeanDefinition 的基本信息实例化 bean 对象。
所以比较简单的做法是,Spring 会自动生成代理对象的代理类。我们在获取 bean 时,Spring 容器返回 ` 代理类对象 `,而不是实际的 bean。
测试代码
本文代码基于 Spring Boot 3.0.2 版本,是一个基于注解的最简调试代码。
注解配置类 AopConfig 如下,功能是对 yano.spring.service 包下的所有类的所有方法进行切面,记录调用方法的参数、返回结果、异常结果、耗时。
package yano.spring.config;

import com.alibaba.fastjson.JSON;
import lombok.extern.slf4j.Slf4j;
import org.aspectj.lang.ProceedingJoinPoint;
import org.aspectj.lang.Signature;
import org.aspectj.lang.annotation.Around;
import org.aspectj.lang.annotation.Aspect;
import org.aspectj.lang.annotation.Pointcut;
import org.springframework.stereotype.Component;

@Slf4j
@Component
@Aspect
public class AopConfig {

    @Pointcut("within(yano.spring.service..*)")
    public void pointCut() {
    }

    @Around("pointCut()")
    public Object around(ProceedingJoinPoint p) throws Throwable {
        Signature signature = p.getSignature();
        log.info("调用开始 {}.{}, 参数 {}", signature.getDeclaringTypeName(), signature.getName(), JSON.toJSONString(p.getArgs()));
        long startTime = System.currentTimeMillis();
        try {
            Object result = p.proceed(p.getArgs());
            log.info("调用结束 {}.{}, 耗时 {}ms, 返回值:{}", signature.getDeclaringTypeName(), signature.getName(), System.currentTimeMillis() - startTime, JSON.toJSONString(result));
            return result;
        } catch (Throwable t) {
            log.error(String.format("调用异常 %s.%s, 耗时 %dms, 异常:%s", signature.getDeclaringTypeName(), signature.getName(), System.currentTimeMillis() - startTime, t.getMessage()), t);
            throw t;
        }
    }

}
Spring 启动类 AppApplication:
@SpringBootApplication
@EnableAspectJAutoProxy
public class Application {

    public static void main(String[] args) {
        SpringApplication.run(Application.class, args);
    }

}
yano.spring.service.ConvertService#convert 用来验证 AOP:
package yano.spring.service;

import org.springframework.stereotype.Service;

@Service
public class ConvertService {

    public String convert(int num, int add) {
        return (num + add) + "";
    }
}
测试用例 AopTest:
package test.aop;

import lombok.extern.slf4j.Slf4j;
import org.junit.Test;
import org.junit.runner.RunWith;
import org.springframework.beans.factory.annotation.Autowired;
import org.springframework.boot.test.context.SpringBootTest;
import org.springframework.test.context.junit4.SpringRunner;
import yano.spring.Application;
import yano.spring.service.ConvertService;

@Slf4j
@RunWith(SpringRunner.class)
@SpringBootTest(classes = Application.class)
public class AopTest {

    @Autowired
    private ConvertService convertService;

    @Test
    public void convert() {
        convertService.convert(1, 2);
    }
}
输出日志如下,可以看到在调用 yano.spring.service.ConvertService#convert 的前后打印出了入参、耗时、返回值等信息。
调用开始 yano.spring.service.ConvertService.convert, 参数 [1,2]
调用结束 yano.spring.service.ConvertService.convert, 耗时 1ms, 返回值:"3"
使用步骤
@EnableAspectJAutoProxy注解开启 AOP;- 编写 AOP 的配置类(使用
@Aspect注解); - 配置
Advice,具体参考 Spring AOP 官方文档; - 配置
@Pointcut,匹配 Spring 容器中的 bean。
@Pointcut 注解的使用示例如下:
@Pointcut("within(yano.spring.service..*)")
public void pointCut() {

}
execution:在使用 Spring AOP 时,这是主要的连接点设计器,用于匹配方法执行连接点。within:限制匹配在特定类型内的连接点(使用 Spring AOP 时仅执行在匹配类型内声明的方法)。this:限制匹配在 bean 引用(Spring AOP 代理)是给定类型的实例的连接点(使用 Spring AOP 时执行方法)。target:限制匹配在目标对象(被代理的应用对象)是给定类型的实例的连接点(使用 Spring AOP 时执行方法)。args:限制匹配在参数是给定类型实例的连接点(使用 Spring AOP 时执行方法)。@target- 限制匹配在执行对象的类具有给定类型的注释的连接点(使用 Spring AOP 时执行具有给定注释的类声明的方法)。@args:限制匹配在实际参数的运行时类型具有给定注释的连接点(使用 Spring AOP 时执行方法)。@within- 限制匹配在具有给定注释的类型内的连接点(使用 Spring AOP 时执行具有给定注释的类型内声明的方法)。@annotation:限制匹配在连接点主题(使用 Spring AOP 时执行的方法)具有给定注释的连接
💡 Tips:上面匹配中,通常 “.” 代表一个包名,”..” 代表包及其子包,方法参数任意匹配使用两个点 “..”。
源码分析
@EnableAspectJAutoProxy 开启 AOP
在 AppApplication 启动类上要加入 @EnableAspectJAutoProxy 注解开启 AOP,查看该注解源码,其 proxyTargetClass() 是在 AspectJAutoProxyRegistrar 类中调用,而 AspectJAutoProxyRegistrar 是接口 ImportBeanDefinitionRegistrar 的实现类。再往上追根溯源,可以看到是在接口 ConfigurableApplicationContext 中 void refresh() 调用。
@EnableAspectJAutoProxy 注解定义:
@Target(ElementType.TYPE)
@Retention(RetentionPolicy.RUNTIME)
@Documented
@Import(AspectJAutoProxyRegistrar.class)
public @interface EnableAspectJAutoProxy {

	/**
	 * Indicate whether subclass-based (CGLIB) proxies are to be created as opposed
	 * to standard Java interface-based proxies. The default is {@code false}.
	 */
	boolean proxyTargetClass() default false;

	/**
	 * Indicate that the proxy should be exposed by the AOP framework as a {@code ThreadLocal}
	 * for retrieval via the {@link org.springframework.aop.framework.AopContext} class.
	 * Off by default, i.e. no guarantees that {@code AopContext} access will work.
	 * @since 4.3.1
	 */
	boolean exposeProxy() default false;

}
class AspectJAutoProxyRegistrar implements ImportBeanDefinitionRegistrar {

	@Override
	public void registerBeanDefinitions(
			AnnotationMetadata importingClassMetadata, BeanDefinitionRegistry registry) {

		AopConfigUtils.registerAspectJAnnotationAutoProxyCreatorIfNecessary(registry);

		AnnotationAttributes enableAspectJAutoProxy =
				AnnotationConfigUtils.attributesFor(importingClassMetadata, EnableAspectJAutoProxy.class);
		if (enableAspectJAutoProxy != null) {
			if (enableAspectJAutoProxy.getBoolean("proxyTargetClass")) {
				AopConfigUtils.forceAutoProxyCreatorToUseClassProxying(registry);
			}
			if (enableAspectJAutoProxy.getBoolean("exposeProxy")) {
				AopConfigUtils.forceAutoProxyCreatorToExposeProxy(registry);
			}
		}
	}

}
IOC 容器管理 AOP 实例
在创建 bean 时,会调用 AbstractAutowireCapableBeanFactory#doCreateBean(…)。
protected Object doCreateBean(final String beanName, final RootBeanDefinition mbd, final Object[] args)
            throws BeanCreationException {

    // 初始化 bean
    BeanWrapper instanceWrapper = null;
    if (mbd.isSingleton()) {
        instanceWrapper = this.factoryBeanInstanceCache.remove(beanName);
    }
    if (instanceWrapper == null) {
        // 1. 创建实例
        instanceWrapper = createBeanInstance(beanName, mbd, args);
    }
    ...

    // Initialize the bean instance.
    Object exposedObject = bean;
    try {
        // 2. 装载属性
        populateBean(beanName, mbd, instanceWrapper);
        if (exposedObject != null) {
            // 3. 初始化
            exposedObject = initializeBean(beanName, exposedObject, mbd);
        }
    }
    ...
}
着重看第 3 步 initializeBean(…) 方法:
protected Object initializeBean(final String beanName, final Object bean, @Nullable RootBeanDefinition mbd) {
	if (System.getSecurityManager() != null) {
		AccessController.doPrivileged((PrivilegedAction<Object>) () -> {
			invokeAwareMethods(beanName, bean);
			return null;
		}, getAccessControlContext());
	}
	else {
		invokeAwareMethods(beanName, bean);
	}

	Object wrappedBean = bean;
	if (mbd == null || !mbd.isSynthetic()) {
		wrappedBean = applyBeanPostProcessorsBeforeInitialization(wrappedBean, beanName);
	}

	try {
		invokeInitMethods(beanName, wrappedBean, mbd);
	}
	catch (Throwable ex) {
		throw new BeanCreationException(
				(mbd != null ? mbd.getResourceDescription() : null),
				beanName, "Invocation of init method failed", ex);
	}
	if (mbd == null || !mbd.isSynthetic()) {
		// 执行每个 BeanPostProcessor 的 postProcessAfterInitialization 方法!
		wrappedBean = applyBeanPostProcessorsAfterInitialization(wrappedBean, beanName);
	}

	return wrappedBean;
}
Spring IOC 容器创建 bean 实例时,最后都会对 bean 进行处理,来实现增强。对于 Spring AOP 来说,就是创建代理类。
上面代码中函数 applyBeanPostProcessorsAfterInitialization(…) 最终调用了 org.springframework.aop.framework.autoproxy.AbstractAutoProxyCreator#postProcessAfterInitialization 方法。
/**
 * Create a proxy with the configured interceptors if the bean is
 * identified as one to proxy by the subclass.
 * @see #getAdvicesAndAdvisorsForBean
 */
@Override
public Object postProcessAfterInitialization(@Nullable Object bean, String beanName) {
	if (bean != null) {
		Object cacheKey = getCacheKey(bean.getClass(), beanName);
		if (this.earlyProxyReferences.remove(cacheKey) != bean) {
			return wrapIfNecessary(bean, beanName, cacheKey);
		}
	}
	return bean;
}
wrapIfNecessary(...) 方法在需要时返回了代理类。
protected Object wrapIfNecessary(Object bean, String beanName, Object cacheKey) {
	if (StringUtils.hasLength(beanName) && this.targetSourcedBeans.contains(beanName)) {
		return bean;
	}
	if (Boolean.FALSE.equals(this.advisedBeans.get(cacheKey))) {
		return bean;
	}
	if (isInfrastructureClass(bean.getClass()) || shouldSkip(bean.getClass(), beanName)) {
		this.advisedBeans.put(cacheKey, Boolean.FALSE);
		return bean;
	}

	// 1. Create proxy if we have advice.
	Object[] specificInterceptors = getAdvicesAndAdvisorsForBean(bean.getClass(), beanName, null);
	if (specificInterceptors != DO_NOT_PROXY) {
		this.advisedBeans.put(cacheKey, Boolean.TRUE);
		// 2. 核心!重点!重要!
		Object proxy = createProxy(
				bean.getClass(), beanName, specificInterceptors, new SingletonTargetSource(bean));
		this.proxyTypes.put(cacheKey, proxy.getClass());
		return proxy;
	}

	this.advisedBeans.put(cacheKey, Boolean.FALSE);
	return bean;
}
上述代码第 1 步 getAdvicesAndAdvisorsForBean(…) 方法是返回某个 beanName 下的 Advice 和 Advisor,如果返回结果不为空的话,才会创建代理。其核心方法就是 createProxy(...)。
protected Object createProxy(Class<?> beanClass, @Nullable String beanName,
		@Nullable Object[] specificInterceptors, TargetSource targetSource) {

	return buildProxy(beanClass, beanName, specificInterceptors, targetSource, false);
}
private Object buildProxy(Class<?> beanClass, @Nullable String beanName,
		@Nullable Object[] specificInterceptors, TargetSource targetSource, boolean classOnly) {

	if (this.beanFactory instanceof ConfigurableListableBeanFactory clbf) {
		AutoProxyUtils.exposeTargetClass(clbf, beanName, beanClass);
	}

	// 1. 获取合适的 ProxyFactory
	ProxyFactory proxyFactory = new ProxyFactory();
	proxyFactory.copyFrom(this);

	……

	Advisor[] advisors = buildAdvisors(beanName, specificInterceptors);
	proxyFactory.addAdvisors(advisors);
	proxyFactory.setTargetSource(targetSource);
	customizeProxyFactory(proxyFactory);

	proxyFactory.setFrozen(this.freezeProxy);
	if (advisorsPreFiltered()) {
		proxyFactory.setPreFiltered(true);
	}

	// Use original ClassLoader if bean class not locally loaded in overriding class loader
	ClassLoader classLoader = getProxyClassLoader();
	if (classLoader instanceof SmartClassLoader smartClassLoader && classLoader != beanClass.getClassLoader()) {
		classLoader = smartClassLoader.getOriginalClassLoader();
	}

	// 2. 创建并返回合适的 AOP 对象
	return (classOnly ? proxyFactory.getProxyClass(classLoader) : proxyFactory.getProxy(classLoader));
}
上述代码最重要的是第 2 步,proxyFactory.getProxy(classLoader)。
public Object getProxy(@Nullable ClassLoader classLoader) {
	return createAopProxy().getProxy(classLoader);
}
ProxyFactory
代码中 createAopProxy() 在 Spring 的实现类是 DefaultAopProxyFactory,从下面代码可以看到最终返回的 AopProxy 一共有 2 种:
- JdkDynamicAopProxy
- ObjenesisCglibAopProxy
@Override
public AopProxy createAopProxy(AdvisedSupport config) throws AopConfigException {
	if (config.isOptimize() || config.isProxyTargetClass() || hasNoUserSuppliedProxyInterfaces(config)) {
		Class<?> targetClass = config.getTargetClass();
		if (targetClass == null) {
			throw new AopConfigException("TargetSource cannot determine target class:" +
					"Either an interface or a target is required for proxy creation.");
		}
		if (targetClass.isInterface() || Proxy.isProxyClass(targetClass) || ClassUtils.isLambdaClass(targetClass)) {
			return new JdkDynamicAopProxy(config);
		}
		return new ObjenesisCglibAopProxy(config);
	}
	else {
		return new JdkDynamicAopProxy(config);
	}
}
查看代码最终发现是在 DefaultAopProxyFactory#createAopProxy(…) 方法中实现。
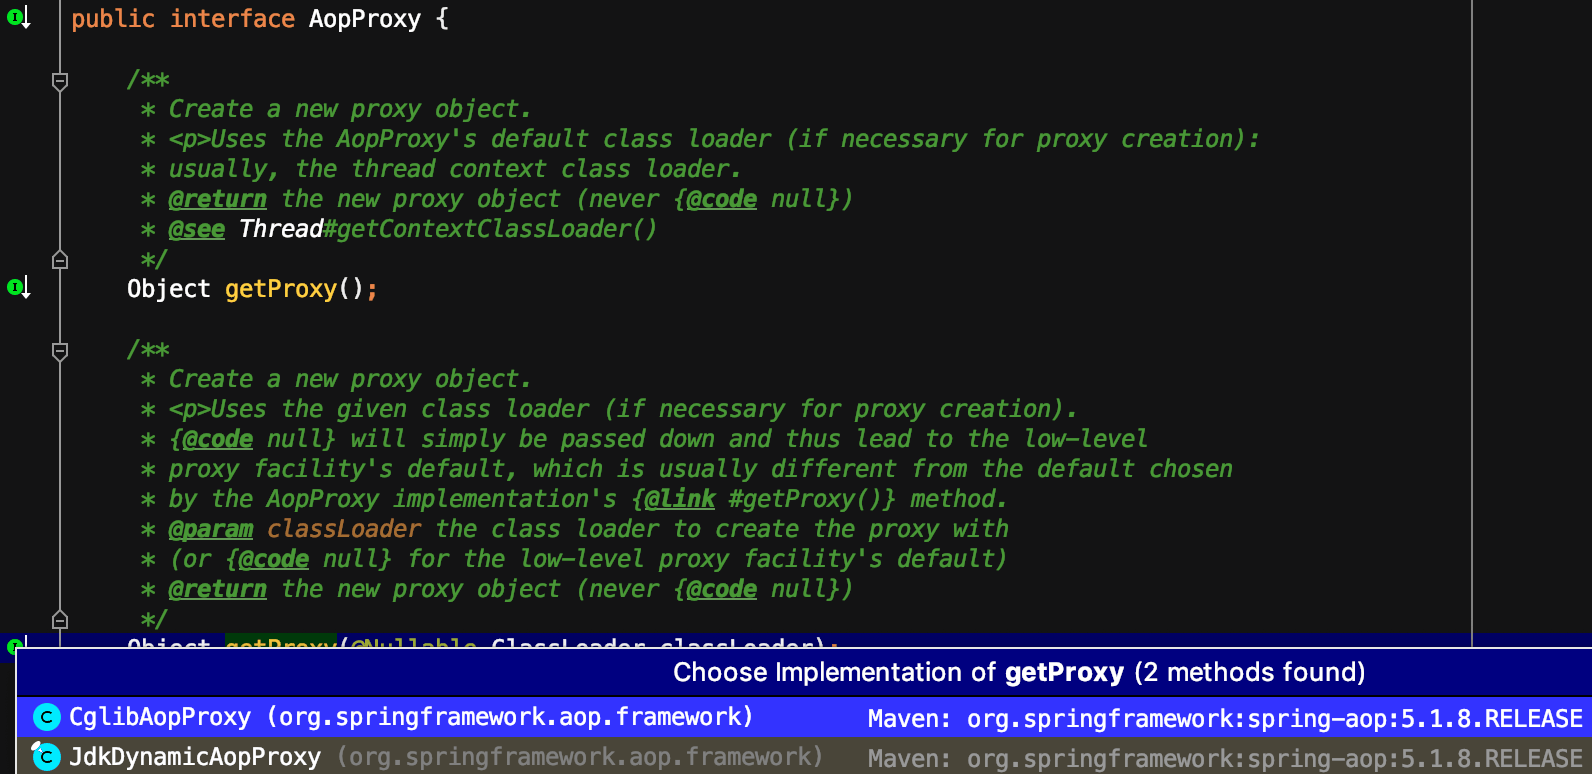
AopProxy 接口的 2 个实现类:
- CglibAopProxy
- JdkDynamicAopProxy
CglibAopProxy
CglibAopProxy 类实现的 getProxy 方法如下:
@Override
public Object getProxy(@Nullable ClassLoader classLoader) {
	return buildProxy(classLoader, false);
}
private Object buildProxy(@Nullable ClassLoader classLoader, boolean classOnly) {
	if (logger.isTraceEnabled()) {
		logger.trace("Creating CGLIB proxy:" + this.advised.getTargetSource());
	}

	try {
		Class<?> rootClass = this.advised.getTargetClass();
		Assert.state(rootClass != null, "Target class must be available for creating a CGLIB proxy");

		Class<?> proxySuperClass = rootClass;
		if (rootClass.getName().contains(ClassUtils.CGLIB_CLASS_SEPARATOR)) {
			proxySuperClass = rootClass.getSuperclass();
			Class<?>[] additionalInterfaces = rootClass.getInterfaces();
			for (Class<?> additionalInterface : additionalInterfaces) {
				this.advised.addInterface(additionalInterface);
			}
		}

		// Validate the class, writing log messages as necessary.
		validateClassIfNecessary(proxySuperClass, classLoader);

		// Configure CGLIB Enhancer...
		Enhancer enhancer = createEnhancer();
		if (classLoader != null) {
			enhancer.setClassLoader(classLoader);
			if (classLoader instanceof SmartClassLoader smartClassLoader &&
					smartClassLoader.isClassReloadable(proxySuperClass)) {
				enhancer.setUseCache(false);
			}
		}
		enhancer.setSuperclass(proxySuperClass);
		enhancer.setInterfaces(AopProxyUtils.completeProxiedInterfaces(this.advised));
		enhancer.setNamingPolicy(SpringNamingPolicy.INSTANCE);
		enhancer.setAttemptLoad(true);
		enhancer.setStrategy(new ClassLoaderAwareGeneratorStrategy(classLoader));

		Callback[] callbacks = getCallbacks(rootClass);
		Class<?>[] types = new Class<?>[callbacks.length];
		for (int x = 0; x < types.length; x++) {
			types[x] = callbacks[x].getClass();
		}
		// fixedInterceptorMap only populated at this point, after getCallbacks call above
		enhancer.setCallbackFilter(new ProxyCallbackFilter(
				this.advised.getConfigurationOnlyCopy(), this.fixedInterceptorMap, this.fixedInterceptorOffset));
		enhancer.setCallbackTypes(types);

		// Generate the proxy class and create a proxy instance.
		return (classOnly ? createProxyClass(enhancer) : createProxyClassAndInstance(enhancer, callbacks));
	}
	catch (CodeGenerationException | IllegalArgumentException ex) {
		throw new AopConfigException("Could not generate CGLIB subclass of" + this.advised.getTargetClass() +
				": Common causes of this problem include using a final class or a non-visible class",
				ex);
	}
	catch (Throwable ex) {
		// TargetSource.getTarget() failed
		throw new AopConfigException("Unexpected AOP exception", ex);
	}
}
CGLIB 生成代理的核心是 Enhancer,详情见:
JdkDynamicAopProxy
org.springframework.aop.framework.JdkDynamicAopProxy#getProxy(java.lang.ClassLoader) 代码如下。其中代码中的 Proxy 是 java.lang.reflect.Proxy,直接使用了 JDK 中的代理,大家应该都很熟悉了,就不作详细介绍了。
@Override
public Object getProxy(@Nullable ClassLoader classLoader) {
	if (logger.isTraceEnabled()) {
		logger.trace("Creating JDK dynamic proxy:" + this.advised.getTargetSource());
	}
	return Proxy.newProxyInstance(classLoader, this.proxiedInterfaces, this);
}
总结
Spring AOP 使用了动态代理,作用于 IOC 容器管理的 bean。在获取 bean 时会根据需要创建并返回代理类。在 Spring Boot 中使用 Spring AOP 时应该先用 @EnableAspectJAutoProxy 注解开启代理,定义代理类和代理规则,不需要额外的 XML 或其他配置。
Spring 的源码太庞杂,调用链太深, 在研究源码的时候应该明确目标,掌握核心原理 。就像学汉语字典,并不需要掌握其中的每一个汉字。
公众号
coding 笔记、点滴记录,以后的文章也会同步到公众号(Coding Insight)中,希望大家关注 ^_^
我的博客地址:博客主页。
